Hugo + blogdown = build sites in RStudio!
It’s possible to create a site like this with Hugo, an open-source and free software static site generators, using an r package called blogdown. I am going to explain how to do it step by step.
I suggest you to take a look also at my sources after reading this post:
- blogdown: Creating Websites with R Markdown (creators of blogdown)
- R Blogdown Setup in GiHub (main source)
- Academic template Demo (information about my template)
Who should use it?
You probably shouldn’t. There are a lot of other free blog services, probably better or easier to use than this, so this method is for you mainly if you are interested in the specific features of this kind of blog (I’ve made a description of some of them on my previous post).
My opinion is that this kind of blog is particularly useful if you are an R/RStudio user and you want to find an easy and fast way to integrate it in your Blog content, using Rmarkdown files. It can be useful also if you are using more than one programming tool and you want to integrate them with the knitr package.
Choose where to deploy it
Since the website is basically a folder containing static files, it is much easier to deploy than websites that require dynamic server-side languages such as PHP or databases. All you need is to upload the files to a server, and usually your website will be up and running shortly. The key question is which web server you want to use.
blogdown: Creating Websites with R Markdown
I’ve chosen to deploy it on GitHub (and I’m going to explain how to do it with this approach), but you can find alternative services, for example Netlify, if you prefer: you can find more information here.
What do you need1:
- Install R development version
- Install RStudio development version
- Install Git
Choose your template:
Hugo supports more than one template (here a complete list). The template I’ve used is called hugo-academic, but there are more suggested templates in the blogdown documentation:
Install blogdown in RStudio:
install.packages("blogdown")
# or if it doesn't work:
install.packages("devtools")
devtools::install_github('rstudio/blogdown')
With the development versions of R/RStudio you often need to install the packages from GitHub, instead of the normal CRAN repository.
Build your blog on Github
1. Create a Github Account with your desired url as USERNAME2:
Your Github account url will be https://github.com/USERNAME 3, if you want your blog url to be https://USERNAME.github.io.
2. Create a repository on Github:
The repository need to have the name of the desired url of the blog, [USERNAME].github.io (in my case palmierieugenio.github.io)4. Initialize the repository with a README.md file (not very important, but useful).
If you notice the structure of the link of my repos https://github.com/palmierieugenio/palmierieugenio.github.io, you will notice that palmierieugenio is repeated twice: it HAS to be in the name of my GitHub profile AND in the name of the repository, like this https://github.com/[USERNAME]/[USERNAME].github.io.
3. Create an empty folder in your computer with the name of the desired url:
USERNAME.github.io, in my case palmierieugenio.github.io, it will be your working directory5.
4. Run in the command line
On Windows operating systems you can use the Git CMD6 terminal, which you should have installed with the Git installation:
cd /FOLDER_PATH/[USERNAME].github.io # your path may be different
git init # initiates repo in the directory
git remote add origin https://github.com/[USERNAME]/[USERNAME].github.io # connects git local repo to remote Github repo
git pull origin master # in case you have LICENSE and Readme.md files in the GitHub repo, they're downloaded
5. Open RStudio and select the Menu > File > New Project >New Directory:
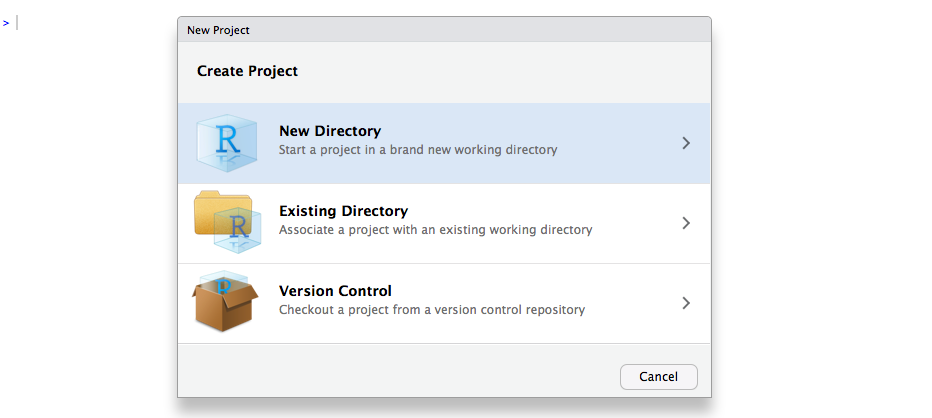
6. Select the Website use blogdown command
It should work, if you have installed the blogdown package:
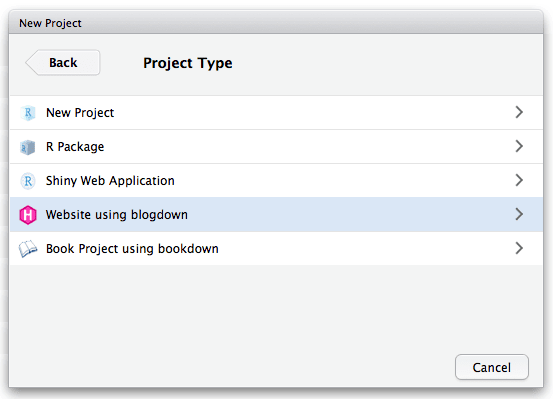
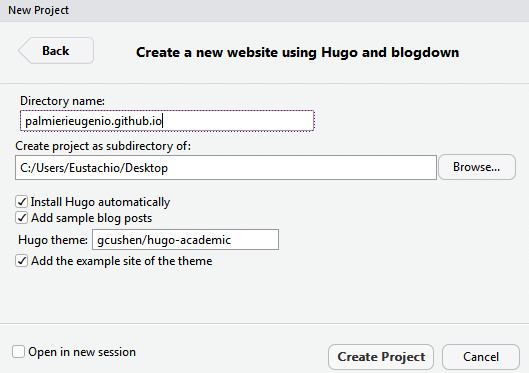
7. Choose a theme
I’ve choosen the gcushen/hugo-academic theme, but there are other suggested Hugo themes:
8. It will appear a config.toml file in the folder.
It is the configuration of the blog7. 
9. Modify your config.toml file
You can see my config.toml file as example here.
baseurl = "/./"
publishDir = "./"

draft: false # if set to true, changes will not be published
ignoreFiles = ["\\.Rmd$", "\\.Rmarkdown$", "_files$", "_cache$"]
enableEmoji = true
avatar = "eugenio.jpg"  # Specify an avatar image (in `static/img/` folder) or delete value to disable avatar.

# Enable global LaTeX math rendering?
# If false, you can enable it locally on a per page basis.
math = true
10. Build your site with blogdown
Open Rstudio and write in the console:
blogdown::serve_site()Now you should see a local version of your blog in RStudio. You should be able to display it on your browser with the button “Show in new window”.8
10. Deploy it on GitHub
Open the Git CMD terminal again and write:
cd /Git/[USERNAME].github.io # your path to the repo may be different
git add . # indexes all files that wil be added to the local repo
git commit -m "Starting my Hugo blog" # adds all files to the local repo, with a commit message
git push origin master # we push the changes from the local git repo to the remote repo (GitHub repo)
Now you are online: you should be able to display your blog on https://[USERNAME].github.io!
Create a new post locally:
To create a post locally, you have to create a .md o .Rmd file in the path\USERNAME.github.io\content\post folder. A fast way to do it is with the button New Post in the Addins menu of RStudio, but it is possible to create a file manually or just as a copy of another article (there should be already posts of example at the creation of the site in the \content\post folder). You can see more info in the Academic template Demo.
Public a new post online:
After the creation of the new post, you have to upload again on GitHub your (modified) folder, the command in the Git CMD terminal are the same:
cd /Git/[USERNAME].github.io # your path to the repo may be different
git add . # indexes all files that wil be added to the local repo
git commit -m "Adding a new post" # adds all files to the local repo, with a commit message
git push origin master
We DON’T necessarily need to use these commands after cd /Git/[USERNAME].github.io, because we have already used them the first time:
git init # initiates repo in the directory
git remote add origin https://github.com/[USERNAME]/[USERNAME].github.io # connects git local repo to remote Github repo
If you have put the wrong link in the git remote add origin command, you can remove it with git remote remove origin and use the git remote add origin again with the right link.
Google Analytics and Disqus:
It is possible to connect the blog with google Google Analytics, to check the data about your traffic, and/or with Disqus, to enable a comment section in your post.
The process is quite simple and similar for both: you just have to go to Google Analytics and activate your tracking ID and copy and paste (locally) it in your config.toml file, like this:
googleAnalytics = "XX-666666666-9" # example tracking IDThe same for the comments, you have to go to the Disqus Website and activate your short name, then write it on your config.toml file:
disqusShortname = "example_disqus_shortname" # example Disqus shortnameTo make the changes effective online, you have to upload them on GitHub with the Git CMD terminal:
cd /Git/[USERNAME].github.io # your path to the repo may be different
git add . # indexes all files that wil be added to the local repo
git commit -m "Creating connection with Google Analytics and Disqus" # adds all files to the local repo, with a commit message
git push origin master # we push the changes from the local git repo to the remote repo (GitHub repo)
A small graphic modification at the Academic template:
I suggest you to make a small modification of the CSS, the hugo-academic.css file in your directory, as suggested in this conversation:
When an article (blog post, etc) has many tags, the share-box floats to the next line and article body text wraps around it. A simple fix is to set the overflow: hidden property for article-metadata.
You just have to open the hugo-academic.css file (also from RStudio you can do it), search (Ctrl+F) for “article-metadata” and set inside the parentheses overflow: hidden;.
Final suggestions
Now you are good to go, I suggest you to play a little bit with the template and customise it, get comfortable with it, before using the blog, and to read the blogdown and Academic documentations:
- blogdown: Creating Websites with R Markdown (creators of blogdown)
- blogdown GitHub
- Academic template Demo (information about my template)
- Academic GitHub
A good way to learn is using examples, I hope the link of my blog directory can be useful:
Have fun!
You may need to unistall the R and Rstudio previous versions from your computer before the installations.↩
Careful when you choose your username, because it will be the url of your site, example: https://USERNAME.github.io/.↩
If you prefer to have different url names for your GitHub profile and Blog (not like my example: https://github.com/palmierieugenio and https://palmierieugenio.github.io), you can follow the note 4.↩
If you want to try with a different named repo, you should go to your repo URL > Settings > GitHub Pages section to activate GitHub pages for it.↩
You need to name the folder on your computer with the long version,
USERNAME.github.io, not the short oneUSERNAME.↩You can use also another terminal, like Git Bash in Linux and OS X (like Mac), or connect RStudio with Github.↩
The picture of this config.toml file is just illustrative and it is taken from another template (theme).↩
There should be a button,
Serve Site, in RStudio for the functionblogdown::serve_site(), in the Addins menu.↩